This is an easy tutorial which teaches you to convert a 2D flag into a 3D flag in a fabric texture!!!....Although this is a simple tutorial but is somewhat lengthy!!!
The basic effect of the tutorial is shown below!!!
2D Flag(Before the effect!!!)
2D flag converted into a 3D flag!!!(After the effect!!!)
The prerequisites for this effects are
1.Photoshop Creative Suite(Preferably CS3 Xtended or above)
2.Flag image(The image shown first!!!)
3.Satin Texture like the one shown below!!!(you may use this one itself!!!)
4.Generally prefer the fabric texture larger in size than that of the Flag image!!!
Now lets see the procedure for creating the effect!!!
Step 1:
Start your Photoshop application and open the Fabric texture and the Flag image.
Step 2:
Select your flag image and follow this
Image---->Image Size(alt+ctrl+i)
note the pixel dimension of the Flag image.
in my example my flag image pixel dimension is 639px x 426px.
Step 3:
Repeat the same procedure for fabric image also and set the pixel dimension's width to the width of the flag image.Here in my example i set it to 639px.The height of the fabric image will proportionately change, don't worry about that we'll adjust that later!!!...
Click on the below image to have a better idea!!!
Step 4:
After changing the image size of the fabric image, now we need to remove the color from the fabric texture!!...so we must desaturate it first!
For desaturating follow the below give procedure having selected the fabric layer!!!
Image------>Adjustments------>Desaturate(Shft+Ctrl+U)
now your fabric image is desaturated!!!
Step 5:
Now we are going to adjust the height of the fabric...Actually we are going to crop the fabric to the height of the flag image!!!...To do that we select the crop tool in the tool bar having selected the fabric image and in the top of your photoshop window you can see the set width and height values!!...set them to the size of your flag image!!!
Then drag the crop selection from one end to the other end as shown!!!
Click on the image to get better idea!!!
Hit return after selecting the fabric image using crop tool!!!...
Step 6:
Now Save this fabric image with .pdd or .psd format!!!
File----->Save As----->(Format:-psd or pdd)
Step 7:
Select the Flag image and following steps
Filter---->Distort----->Displace
Settings-
Horizontal Scale:10
Vertical Scale :10
Stretch To Fit
Wrap Around
Step 8:
Now it'll ask for a PSD file!!....select the file which you hav saved in step 6.
Your flag image must be some what distorted!!!...
Step 9:
Now drag the fabric layer onto the flag image layer!!!...
and change the Blending option of the fabric layer to Hard Light
Now you must have the image in the similar manner!!! as shown below!!!
Click on the image to have a clear overview!!!
Step 10:
Now you are almost ready!!!....All you need to do is adjust the Levels of the resultant flag image!!!...
Your 3D-Flag is ready now!!!...Please leave comments so that it would be helpful for the other tutorials!!!!
Resultant Image!!! looks like this
Now this tutorial teaches you how to convert a photograph to a pencil sketch!!!
the above image will be changed to the pencil sketch shown below!!!
now lets start the tutorial!!!
Step 1:
Open the Photoshop Application and open your desired picture which you want to change into a pencil sketch.
Step 2:
Now create a duplicate of the existing layer(background layer) and Invert(ctrl+i) the duplicate layer.
Step 3:
Now desaturate both the layers(shift+ctrl+u).At this moment your picture should look similar to this!!!!
Step 4:
After this change the blending mode of the top layer to Color Dodge.
Then use Gaussian Blur and set the radius accordingly so that it looks like a pencil sketch.I used radius as 2.3 pixels.
After this your picture should look like this!!!!

The basic goal of this tutorial is...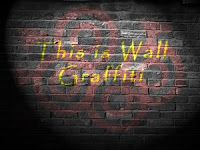
let me start with the basic requirements for this effect!!...
All u need is a stock image of a wall texture and photoshop (cs x) recommended.
This is a very easy effect to produce!!!
Step1 :
First start your photoshop application and then open your wall texture stock image...you can get loads of such textures in Google!!!...just search for wall texture in Google Images!!!....
i've choosen my wall texture as the below given image!!!
It would be better if you choose a dark colored(preferably grey and rough) wall rather than a light colored one!!!!..... 
Step 2:
Then after opening your Wall Texture..
Choose Horizontal Type tool and then write your desired text on your wall texture or you may even place your desired image if you wish in a new layer upon your wall texture!!!...
Step 3:
After you finish placing the image or writing your desired text on your texture!!!...
then set the blending mode of your text layer or your image layer to Overlay
Now your image should luk like this!!!
This is the basic idea of creating your own graffiti anywhere!!....now play with your imagination and enjoy photoshopping!!!
!!!
Bye for now.....meet you with more tutorials in the time ahead!!!!!........
